Product Review: Custom Reptile Habitats Essential 4 Enclosure + Hood
September 20, 2019
ReptiFiles was provided a free product in exchange for an honest review, whether positive or negative. This review is my honest, unbiased opinion.
OCTOBER 24, 2024 UPDATE: This review is 5 years old at this point, and may not accurately reflect the product currently in production. Links to Custom Reptile Habitats have been temporarily removed from this article due to multiple reports of unfulfilled orders and refund complications.
Once upon a time, 36”x18”x18” (40 gallon) enclosures were considered a standard of good husbandry in the US. If you cared about your medium lizard/snake, then they were housed in no less than a 40gal. However, there is no one perfect, failproof method of establishing the “minimum” amount of space that a captive animal can be ethically allotted. Should the minimum requirement mimic the size of a wild reptile’s recorded territory? Or should the minimum requirement cater to the needs of the reptile enthusiasts and collectors, most of whom being significantly limited in terms of available cash and space?
Well-meaning governments have tried to establish minimum enclosure size in an attempt to promote animal welfare. These standards typically using animal’s body length as a relative unit of measurement, and change depending on the type of reptile in question. While a good idea in theory, not all governments work with reptile experts in the development of these standards, subsequently creating minimums so small as to be ludicrous if applied.
Ludicrous though they may be, we have to assume that any stated minimum will be doggedly adhered to as if anything larger is illegal. Human nature has proven time and again that we as a species prefer to do the bare minimum to earn the associated reward. When grocery shopping, we’re more likely to choose the cheaper product on the shelf, despite the fact that said cheaper product may be impure or less flavorful than its more expensive counterpart. When maintaining our cars, we’re likely to procrastinate an oil change or tire replacement for as long as possible, despite that this puts our cars and even health at risk. Or how we only fill the fuel tank when the “EMPTY” light starts blinking at us.
So it happens that humans — even the best of us — find ourselves adhering to the perceived minimums of reptile care. And evidence has shown that the minimum requirements spouted by most care sheets are still woefully inadequate as ethical long-term housing. Obesity among captive reptiles is astonishingly common. Species known to traverse miles in the wild sit motionless and mindless in enclosures so small they can barely move.
Is it even ethical to even keep reptiles in captivity, then? Well, that’s a discussion for another time. But if you’re interested, here are some articles on the subject:
- Is it Inhumane to Keep Exotics as Pets? — The Ethics of Reptile Keeping
- Is Your Reptile Husbandry Up to Standard? — Expanding on the 5 Freedoms of Animal Welfare
- Do You Use Reptile Racks? If You’re Not a Breeder, Read This
In an effort to provide more humane housing for our pets, reptile experts are expanding on previously-established minimums. Picking a number and calling that the new standard seems like a rather arbitrary process, and to be honest, it is — a little. However, in the effort to universally raise the standards of pet reptile care, we must take it one step at a time. And while going from 40 gallons to 120 may seem like something of an enormous step, it actually makes sense when you think about it:
- 40 gallon enclosures measure 3’x1.5’x1.5’. Upgrading to a 4’x2’x2’ enclosure as the standard is actually just a total increase of 1’ in length and 0.5’ in width and height, making it a logical next step for a size increase.
- 4’x2’x2’ is a fairly easy enclosure size to build, in terms of materials and measurements. This makes them more efficient to manufacture.
- 4’x2’x2’, although large, fits well onto most tables and shelving systems utilized by reptile enthusiasts to display their collections. Anything larger may not be sustainable.
As reptile care experts and conscientious reptile owners have clamored for higher standards, both new and existing reptile enclosure manufacturers have stepped up to oblige. One of these new manufacturers to step onto the scene is Maximum Reptile, exclusively sold by Custom Reptile Habitats.
Although Custom Reptile Habitats is new to the hobby, its owner, Paul Barclay, is not. He has been designing and building reptile habitats for over 43 years, with experience in creating setups for personal collections as well as commercial displays. As their website boasts, “Maximum Reptile™ enclosures are built up to a standard, not down to a price.”
Let’s see about that.
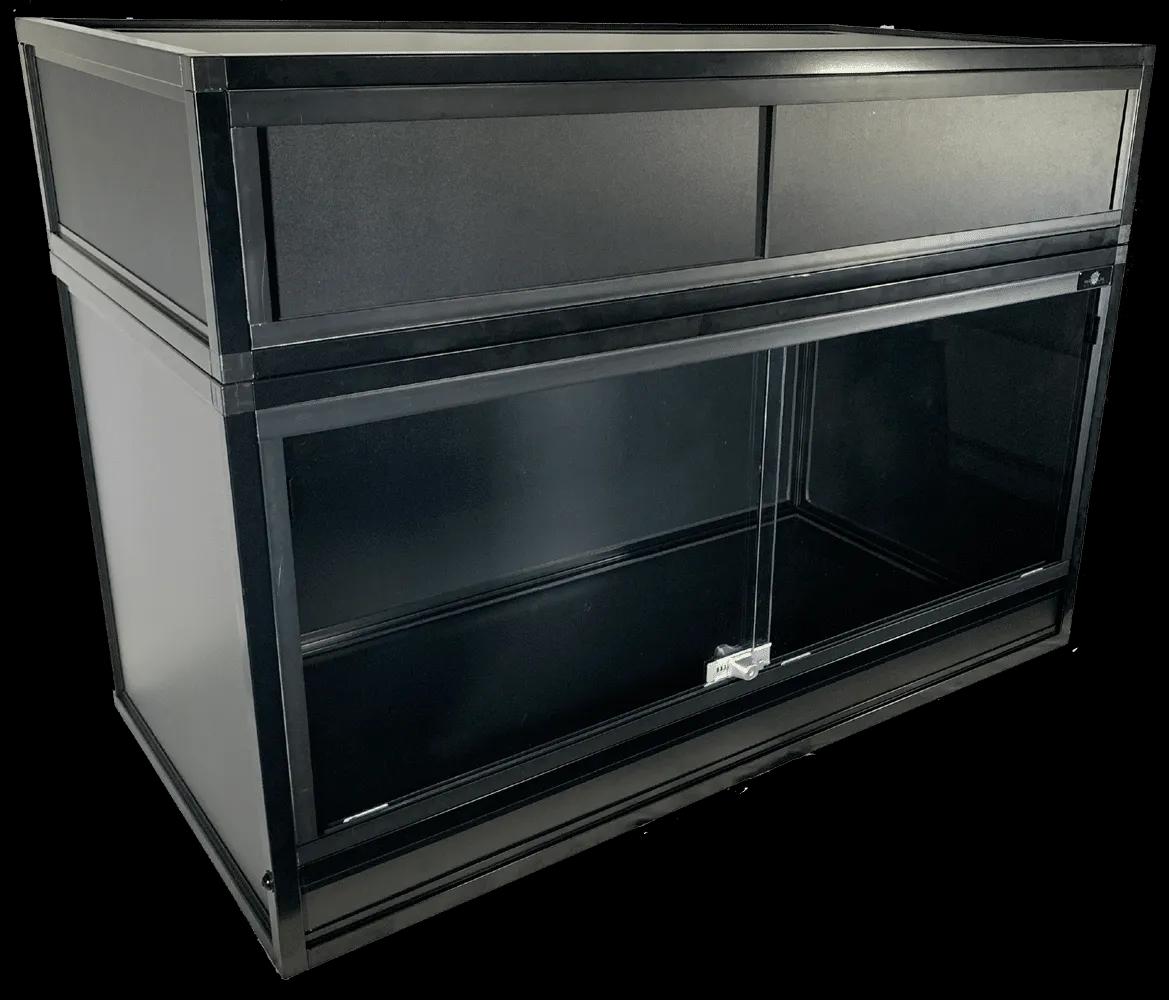
Custom Reptile Habitats Essential 4 Enclosure — Product Specs
- measures 48”x24”x24”
- 7.51 sq feet of floor space
- 5” substrate shield is for thicker substrate layers and plants
- includes a digital thermometer/hygrometer with probe
- black PVC walls
- powder coated aluminum frame
- front-facing sliding glass doors
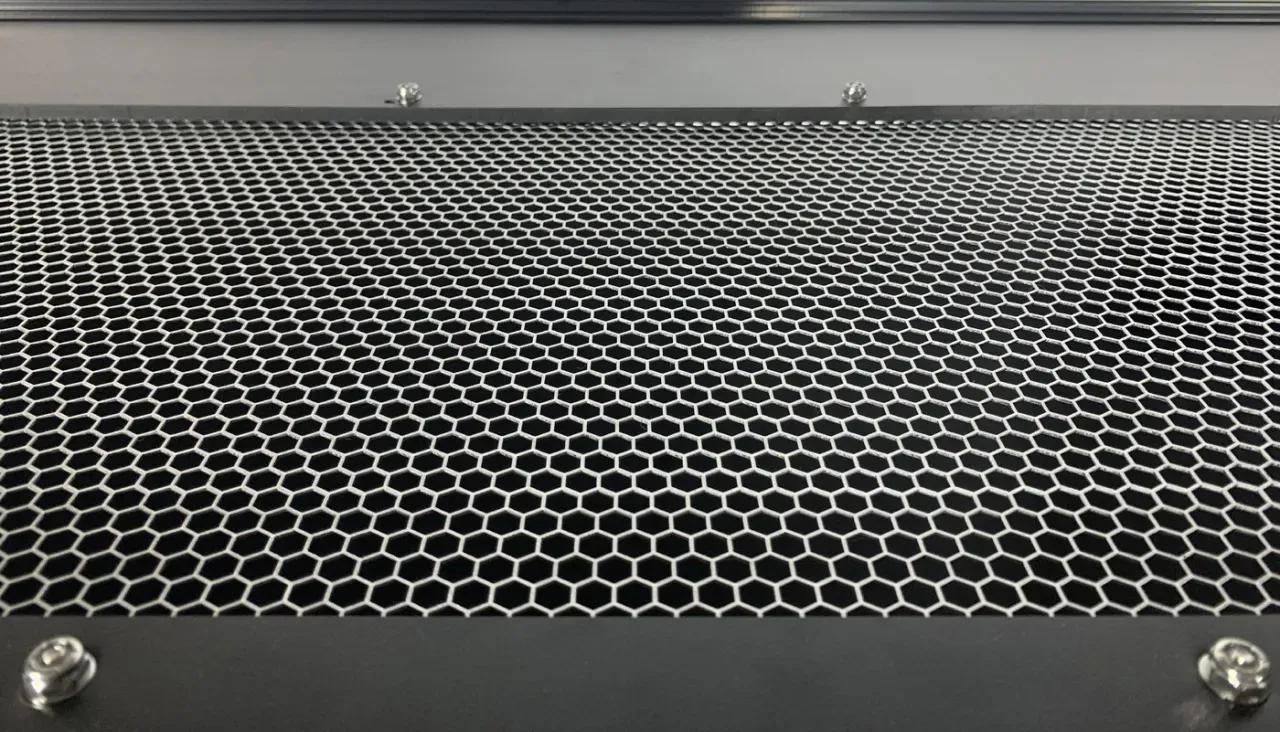
- partial or full aluminum screen on top for ventilation
- large holes in mesh allows 77% of UVB through
- optional hood, stacking spacers, terrarium stand, humidity plug (we tested the hood, but not the others)
- highly water-resistant and perfect for use with high humidity species
- advertised for use with bearded dragons, ball pythons, colubrid snakes, and other medium-sized reptiles
- 10 year warranty available
- made in the USA
- financing available through Paypal Credit
- order fulfillment takes up to 3 weeks
Functionality Assessment
Packaging and Unboxing
Custom Reptile Habitats’ enclosures typically ship flat, with the front-back, and top pre-assembled. However, in my case, the enclosure was shipped pre-assembled via freight. This made the package heavy and rather inconvenient to receive, but on the upside it was very well packaged. If anything there was too much bubble wrap (although is that possible?) and the wooden shipping crate seemed a little overkill. Nothing appeared damaged in transit, though.
As I unboxed the enclosure, the only fault I noticed was that the glass didn’t come with a protective film, so it was fairly dirty out of the box. I was able to clean it just fine, and fortunately there were no scratches, but that was inconvenient.
Putting it Together
THE ENCLOSURE—
Although I didn’t have to do much in this department because the enclosure came mostly pre-assembled, here are some notes about what remained of the process:
This enclosure is designed so silicone can be easily added along the base and up the sides to prevent leakage. I received the enclosure with black silicone already installed and it was very watertight – not a leak to be found, despite my best (reasonable) efforts! I daresay the manufacturer did a better job of applying the silicone than I would have on my own, so there’s one reason to spring for the convenience of ordering this enclosure pre-assembled.
The enclosure came with a small plastic bag that contained pins for stacking the hood, a key for the door lock, and a strip to keep any small bugs from escaping from where the glass meets in the middle. The strip is black, and designed to stick to the edge of the glass door with the lock on it. Overall fairly straightforward, but I would have liked for these parts to come with printed instructions.
This enclosure also came with substrate support panels, as I indicated that this enclosure would be used for a bioactive setup. The support panels are designed to help support the extra weight of the substrate and prevents it from pulling on the frame and warping the floor. The panels fit well in the small space under the floor of the enclosure, and we had no unusual trouble getting those in place.
THE HOOD—
There’s actually lots to say here, because I was actually able to assemble this part myself. Bear with me, as this is going to be pretty thorough (in retrospect, I should have published a separate review for the hood).
Special features:
- mesh cutout on top
- built-in digital probe thermometer/hygrometer
The assembly is fairly straightforward. If you know how it’s supposed to look and function, you can figure out how to put it together even without instructions. Plus, there’s even a label on the top indicating which side should be installed facing up. If you’ve read my other reviews, you know that I LOVE labels. Can’t get enough of them!
The hood’s assembly is not designed to be tool-free. You will need a hammer to fit the pieces of the frame for the hood (and enclosure, for that matter) together, and you will also likely need a screwdriver to install the thermometer/hygrometer into its window.
Because the joints between pieces are such a tight fit, this hood is clearly not designed to come apart easily. This quickly becomes a problem if someone (not me) makes a mistake during the assembly process and realizes, “Great, I put the frame together, but I forgot to slide the PVC panels in.” (You can take it apart by standing on one side of the frame and yanking on the other.) I think a certain degree of user error forgiveness is an important feature in any product that requires the customer to assemble it themselves.
The thermometer/hygrometer insert panel uses 3M VHB double-sided acrylic foam tape to adhere to the hood. Which means it’s incredibly strong. Once placed, that thing isn’t going to budget so much as a millimeter no matter how hard you try — short of breaking the hood itself. It’s incredible stuff!
It’s important to note with this hood design that one of the door tracks is deeper than the other. This is intentional, as it enables you to be able to pop the doors in and out as needed. However, if labels are an option, this would be a good place to put a “this side down” sticker or similar.
The product I received had a slightly crooked track on one side. It doesn’t significantly impair the function of the door, but it does stick a bit on that side. I pointed this out to the manufacturer and they said it was a quality control error as a result of their recent expansion, and shouldn’t happen again. Overall the doors slide very well and smoothly — almost too quickly, actually. You have to be careful about how much force you use them with, or else they’ll slam.
Improvising
The cutout in the PVC was the perfect size for mounting the device, but I did have to loosen the screw for the “lock” that holds the device in place to actually be able to do its job. There was also the problem of getting the probe inside the enclosure from above, which I eventually had to solve by making a hole in the top with a drill.
The thermometer/hygrometer has a metal-tipped probe with a 6 ft. cord. According to the instructions I received, this probe is recommended to be inserted by drilling a hole big enough for the probe to pass through the wall and then adding a dab of silicone to secure it in place. I’m not a fan of modifying enclosures, as this makes them less available for being repurposed.
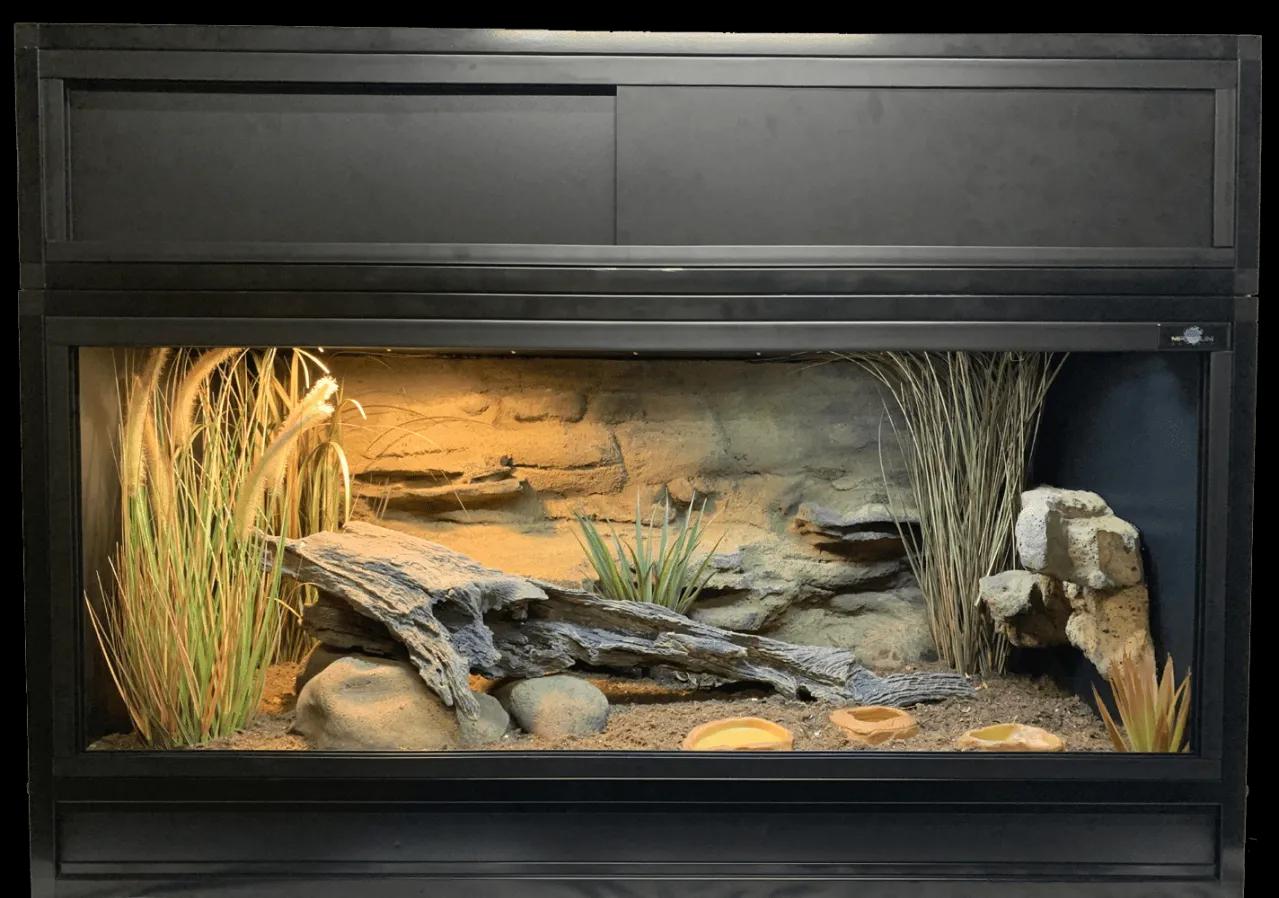
The Final Result
The final result is a 4’x2’x2’ enclosure with a 5” substrate shield, glass doors that roll along a track, a mesh cutout for installing lighting on top of (rather than inside) the enclosure, and a 48”x10” hood with hinged doors to hide the lighting equipment.
It’s about as lightweight as you could expect for a medium-sized PVC enclosure, despite the durable construction. I could lift it easily by myself, so the only reason I needed assistance to get it in place was just because of its unwieldy proportions.
Having a raised lip to allow for a deep substrate layer is fantastic. Most PVC enclosures do not have this feature, limiting keepers to thinner, less functional layers of substrate, with live plants being restricted to pots. Deep substrate is important for maintaining humidity and facilitating natural burrowing/digging behaviors in reptiles. And bioactive? Not an option without significant modifications. With the 5” substrate shield, the enclosure easily held about 108 quarts of substrate. In this case I used 3 bags of The Bio Dude’s Terra Sahara, moistened with 3 gallons of water.
The doors of this enclosure are very well designed. Since they’re made from glass, they’re unlikely to scratch easily, which is essential for long-term durability. Each door has a discreet handle for sliding it open without having to touch the glass, and the best thing is that the doors actually slide about 1/2 to 1 inch into the enclosure’s frame. Coupled with the natural weight of the glass and the sliding lock, this makes the doors more secure than average for this enclosure style, perfect for housing snakes. That being said, the doors can be easily removed for cleaning or greater enclosure access , and just as easily replaced.
The hood is a great idea in terms of aesthetics — after all, not everyone wants to see the “magic” behind the scenes of a great reptile enclosure. However it does reduce the ventilation potential for the enclosure itself, as well as reducing airflow around the lighting fixtures. Heat lamps and T5 HO fluorescent light fixtures need good ventilation to prevent overheating, protect against fire, and to maximize the lifespan of the equipment.
I love the concept of the digital probe thermometer/hygrometer being built into the hood. This is an essential device for any reptile enclosure, and the built-in feature makes it possible to do this in an attractive, streamlined manner.

Things I Liked About the Custom Reptile Habitats Essential 4 Enclosure + Hood
- 77% UVB transmission through mesh is significantly better than the 50-60% we see with some other popular enclosures with finer mesh. I still recommend mounting UVB lamps under the mesh for species with high UVB requirements, but it’s still more convenient.
- Buyers can choose between a 50% or 100% mesh top, which customizes the enclosure to both the reptile’s needs and the keeper’s preference.
- I love that the doors slide into the frame on the sides, rather than just stopping. Great bit of extra security right there. Despite this, the glass doors are also VERY easy to remove for cleaning or enclosure maintenance.
- The doors are well sanded and smooth right out of the box – I wasn’t worried about getting cut accidentally. Nice bit of attention to detail there.
- Doesn’t have the ugly bar in middle of front that most PVC enclosures have, greatly improving appearance and one’s ability to see inside.
- The included pins are helpful for keeping the hood from sliding around, as it’s fairly lightweight and shifts relatively easily without them.
- The built-in thermometer/hygrometer provides a great way to check your reptile’s temperature and humidity at a glance while still being able to choose where the probe goes.
- The foam strip is helpful for preventing insect escapes, which is a definite concern, especially with crickets!
- 5” lip = very compatible with deep substrates, whether bioactive or just naturalistic. Definite plus!
- The availability of stacking spacers makes the enclosure more practical for use with reptile collections.
Things I Didn’t Like About the Custom Reptile Habitats Essential 4 Enclosure + Hood
- Requires tools to put together.
- Not very forgiving of mistakes made during assembly.
- Purchasing the hood along with the enclosure is an extra $200, which is very expensive for a cosmetic accessory.
- Shipping isn’t free. However, $30 shipping for such a large enclosure is quite reasonable.
- I would have liked to have had a chance to review the enclosure’s assembly instructions, as at present I can’t vouch for how well-written/instructive they are.
After 6 months of use, the doors have turned out to be my biggest frustration with this enclosure. One of the “handles” on the doors has come loose, so it will occasionally slide off and needs to be glued into place. In addition to one of the handles getting loose, one of the wheel sets for the doors has also come loose and requires gluing down.
While wheels are a nifty feature, they are a bit loud and cause a rattling sound when the enclosure is opened. Considering that I’m housing a very skittish Sudan plated lizard in this enclosure, this is a sure way to send her dashing away every time I open it up. All of my other front-opening enclosures use sliding tracks and operate much smoother and quieter.
Conclusion: Custom Reptile Habitats is truly dedicated to quality in reptile enclosures
ReptiFiles Rating: 4.5 stars
After I first published this review, Custom Reptile Habitats took ReptiFiles’ advice to heart and redesigned both their hood and enclosure to better facilitate optimum function and reptile welfare. After just 6 months of working with this brand, I have come to strongly appreciate Custom Reptile Habitats’ commitment to quality, innovation, and perpetual improvement.
Working on this review inspired me to take a closer look at the PVC enclosures currently available on the market, and while I have yet to find something that I would call the “perfect” PVC reptile enclosure, Maximum Reptile is on the right track. The only reason this didn’t quite score 5 stars was because of the way that the doors rattle when used (even with a clear track), making them the noisiest enclosure doors I’ve had to deal with so far.
The Custom Reptile Habitats Essential 4 Enclosure is thoughtfully and beautifully constructed for both form and function, with some unique features that are either new to the PVC scene or improve on the current offerings. This enclosure is particularly well suited to bioactive enclosures, with highly water-resistant walls, a deep substrate tray, and a strong metal frame to support heavy contents.
Although the Custom Reptile Habitats Essential 4 Enclosure is more expensive than some other enclosures in its category, it’s important to remember that these are built to last. The ambitious 10-year warranty that comes with them is very promising of the confidence that the manufacturer has in the quality of their product.
Time will tell if the construction is truly as durable as advertised, but older brands who also offered this kind of durability gained trust and popularity in the reptile community. In my opinion, this longevity well justifies the higher initial investment.
What reptiles can be housed in the Custom Reptile Habitats Essential 4 Enclosure?
With the 50% mesh top, this enclosure works best for medium-sized reptiles with low to average basking temperature (<100°F) and medium to high humidity needs, such as:
- ball python
- blue tongue skinks
- corn snake
- kingsnake
- milk snake
- rainbow boa
With the 100% mesh top, this enclosure is also suitable for species with medium-sized high basking temperature (>110°F) and low humidity requirements, such as:
- bearded dragon
- plated lizard
- uromastyx
Payment plans are available through Paypal Credit.
ReptiFiles’ Advice for Reptile Keepers — When you’ve set up your Essential 4 Enclosure, here’s some pro tips for success:
- Make sure to vacuum out the track regularly, especially if you are using a deep substrate or have a species that likes to dig and fling substrate everywhere.
- You will need to clean the glass panels before installation.
- Use distilled water for misting to prevent accumulation of water spots on the walls and glass.
- When installing the thermometer insert panel for the hood, be *very* careful about placing it. Once the tape makes contact with the PVC, it’s stuck for good and you won’t be able to adjust it.
- Use two digital thermometer/hygrometers. One probe should be placed on the cool end, and one should be placed on the basking spot. This will give you a better idea of the gradients within the enclosure.
- Install the enclosure and hood at least 1” away from the wall so the back window will have room to vent hot air.
- If you are housing a high temperature species, use a higher basking platform so you can get the required basking temperature without introducing too much heat to the rest of the enclosure.
Comments
Authenticated users can leave comments on this post. All new comments are given the status "draft" until they are approved by an admin. Draft comments are not accessible to the public and will not show up on this page until it is marked as "published". To manage all comments, navigate to the admin dashboard.